405 New Meadow Rd
Barrington RI 02806 USA
Questions? Contact us at:
1-401-245-4068
info@petersonengineering.com
BALANCING YOUR FORK MOUNTED SCT
Good balance is absolutely critical for imaging and even when using a scope visually good balance saves wear on the drives. Balancing a wedge mounted SCT isn't that complex if one does it by following a simple 1-2-3-4 sequence. And for an Alt/Az configuration just ignore step 4.
First, point the tube horizontal with all piggyback scopes plus accessories and with dew shield mounted. Start out with no counterweights. In this initial step you want to lock the RA axis and simply balance the main scope front to back on the DEC axis with as little weight as possible.
The first balance adjustment to explore is positioning any piggyback scopes themselves forward or backward along the main scope tube. The less out of balance things are the better.. So minimize the out-of-balance situation before playing with counterweights.
With a piggyback or two on top you’re going to need counterweight on the bottom and the easiest way to achieve full balance is to simply place a weight equivalent to each piggybacked scope exactly 180° from the appropriate scope with the weight center at the same distance from the optical tube as the piggyback scope centerline. These counterweights can now be moved forward and backward to better balance the horizontal tube.
Second Because the main optical tube doesn’t extend very far behind the azimuth axis most SCTs are nose heavy – more so with addition of a dew shield. There’s a possibility that even with shifting your piggyback scope/scopes toward the rear, and even with moving your bottom mounted counterweights to the rear your optical tube is going to be nose heavy. Think of it as a seesaw. Or as a balance. You can balance with a heavy weight close to the fulcrum or a light weight further from the fulcrum. This is a crucial concept because one wants to use the maximum offset so as to use the minimum counterweight. The solution is to either extend the counterweight rails toward the rear or add an additional on-axis counterweight that won’t impact balance when you point the tube up (in the next step).
Third, once the scope’s balanced horizontally point the tube straight up vertically. With the AZ axis still locked release the DEC axis and move your bottom counterweights closer to or away from the optical tube until you achieve balance. Note that extending the weights more than 10″ or so from the tube may result in them hitting the fork.
Fourth: At this time you optical tube should be almost balanced. Lock the declination and release the azimuth lock to test the azimuth balance of the entire telescope including mount. Normally, a naked fork mounted big Meade on a wedge will be a little heavy to the west because the dec drive is in the west fork. Weight can be added to the east fork to achieve final system balance. In the northern hemisphere aim for a very slight bias to the east so that as the scope tracks the drive gears will always be fully engaged. Note that for a scope run in Alt/Az (no wedge) there’s no need to balance the scope in Azimuth and you should ignore this fourth step
The less weight your scope is carrying the better it will track. Make every effort to minimize weight. Once you’ve gone through the 4 steps above you can fine tune if you wish. Because this is a fork mounted scope it may be impossible to achieve perfect wedge mount azimuth balance when imaging low to the E or W but you shouldn’t be too far out of whack.
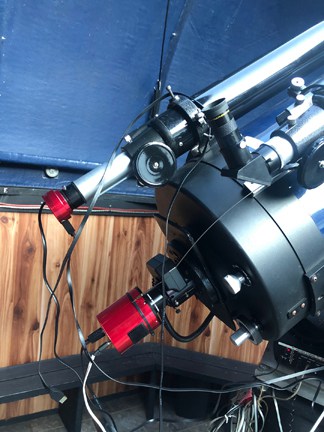
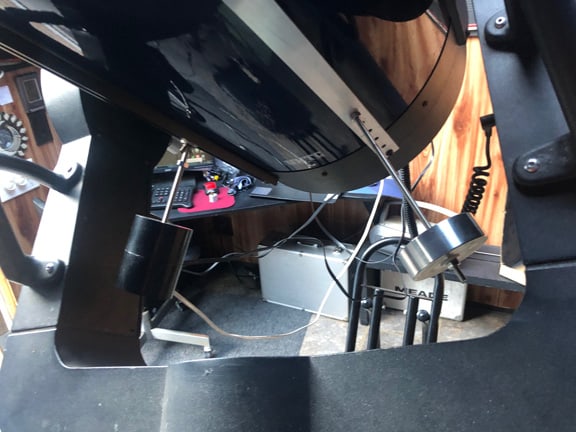
These two images show my prime focus setup with an ASI2600MC-P mounted to a 14” LX200GPS. A pair of 80mm refractors are piggybacked – an f/11.3 guidescope and an f/5.
Keeping the weight down is critical for guiding/tracking. When tracking there’s no vibration so ultra-rigidity isn’t really necessary. Most dovetail rails used to mount accessories are relatively heavy weighing several pounds each. I’ve 4 mounting rails – 2 for the scopes and 2 for the offset counterweights. These are simple lightweight aluminum channel or aluminum extrusions.- Three I fabricated myself and one was purchased from ScopeStuff.
This scope is equipped with the EZ Balance on-axis counterweight as well as the 2# Azimuth fork arm counterweight sold on the Peterson website. Also note that the counterweights on the bottom rails are directly opposite the piggyback scope that they are balancing and that the heavier weight is opposite the heavier scope.
If you look close enough you’ll find a pickle jar cap fine focus on the guide scope.
The bottom cylindrical counterweights are extended out from the OTA on threaded rods. Using lightweight not-quite-as-stiff rail setups I’ve saved several pounds. And with the weights extending out away from the tube I’ve saved several more pounds. Minimizing weight is critical for guiding/tracking. When tracking there’s no vibration so ultra-rigidity isn’t really necessary.
Also note that the counterweights on the bottom rails are directly opposite the piggyback scope that they are balancing and that the heavier weight is opposite the heavier scope.
Keep it balanced and keep it light.
And one final hint – Don’t use rail mounted counterweights if you don’t have a piggyback load. The offset weight will ruin your vertical balance. Keep everything on-axis. The best cure for a tail-heavy telescope is a dew shield. The best cure for a nose-heavy telescope is changing from 1 1/4″ optics to a heavier 2″ diagonal and eyepiece.