405 New Meadow Rd
Barrington RI 02806 USA

Questions?  Contact us at:
1-401-245-4068
info@petersonengineering.com

Autostar Keypad Repair

Meade controllers use a “rubber keypad” and after a year or two the contacts oxidize and one must push hard to make the button function.  This repair fixes non-responsive Autostar buttons.  The hand control demonstrated is the Autostar II, but the same process applies to the Autostar III and other similar hand controls.


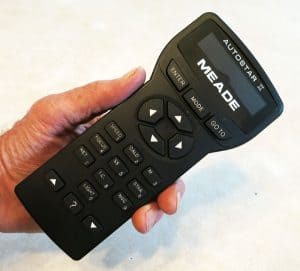
Peterson Engineering assumes no liability should you be ham-handed and damage your control using this free repair guide.  But should you muss up, Meade does sell replacement $115 Autostar II hand controls, as well as Autostar III and other hand controls at https://www.meade.com/spare-parts.html Read through the instruction to get an idea as to how it’s done and whether you’re up for doing it.

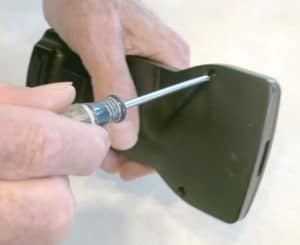
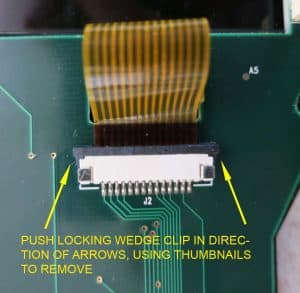
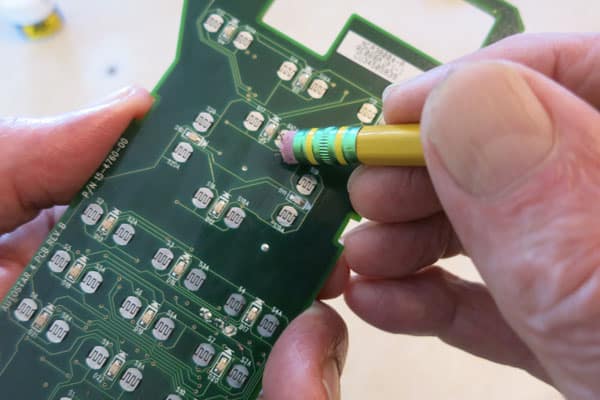
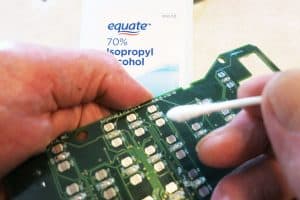
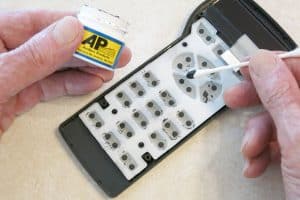
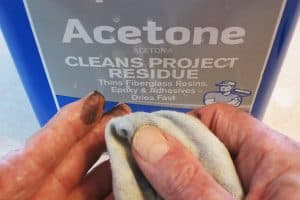
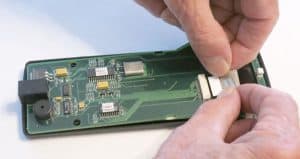
This repair requires a #0 Phillips head screwdriver, cotton swabs (such as Q tips), medical alcohol, an eraser on a pencil and, optionally, a rubber keypad repair kit if you wish to go beyond just cleaning the contacts. 

Using a tiny #0 Phillips head screwdriver, remove the 4 screws holding the case together, being careful not to open the case.

Holding the keypad face down, carefully remove the rear of the case.  There is an extremely fragile ribbon cable toward the top of the control that connects the LED display to the circuit board and you absolutely positively do not want to pull on it.

It is necessary to unplug this ribbon cable from the circuit board, and the process can be a bit tricky.  The ribbon cable is just that.  There’s no connector on it.  Instead it’s placed into a mating connector and a wedge clip is forced on top of the cable pressing the cable against the contacts of the mating connector.  Do not attempt to unplug the cable by pulling on it.  The wedge clip must first be removed.

And this is the trickiest part as Meade has used 2 or 3 different wedge clip configurations. 

It may be possible to simply push the wedge out. 

Or it may be necessary to use a very narrow tool such as a knife blade to push latches in one side at a time while working the wedge out of the connector.

Once the locking wedge clip is removed the ribbon cable is free.

Notice the conductive copper runs on the bottom side of the ribbon cable.   Treat the cable delicately.

With the cable lose you may remove the circuit board to access the rubber keypad and the contact side of the circuit board.  It is not necessary to remove the rubber keypad from the plastic front part of the hand control.

Pick up the circuit board and view the silver contact pads on the keyboard side.  Also note that there are two raised pads on each of the rubber buttons.  The rubber is conductive and pressing down on the button connects the two silver contact pads closing the key’s circuit.  For the button to work both raised rubber pads must make good contact with the associated silver contacts.

If this Autostar is anything but new there will be an oxide coating on the circuit board’s silver contacts.  They may be so far gone that they are a dull gray color.  Using a pencil eraser individually clean each silver contact pad until the silver is shiny.  Be careful not to disturb the miniature LED button lights between each pair of contacts. 

Now clean the 2 raised conductive rubber pads on the back of each buttons.  Again a cotton swab dipped in alcohol is probably the best approach.

While simply cleaning the silver and the rubber pads (as detailed above) should be adequate to get the keypad back to “like-new” performance, this is the point where one may apply a “rubber keyboard fix” epoxy silver paste to the raised conductive rubber pads. 

OPTIONAL STEP

Rubber keyboard repair kits are available online for around $30, and after investing the work already performed to repair the rubber keys  I’ve found them to be worth the benefit of making the keypads super responsive while also extending the life of the keypad by more than double. 

It’s difficult to apply the conductive epoxy paste without smearing it a bit but try to be as accurate as you can, and wipe off any excess.  And keep the application very thin.

Tip: In my 50 years of shop work I’ve found acetone to be the ultimate cleaner for glues and paints.  And conductive epoxy paste.  It’s highly flammable, one must avoid getting it in the eyes, and it’s recommended that one wash one’s hands after contact.  Again, this is an observation and not an instruction.  Do with it what you will but be forewarned.

Allow everything to dry – including the silver-epoxy if you used it.  And then, with the face of the hand control down, place/fit the circuit board into the hand box case with the silver contacts down, facing the rubber buttons.

Handling it very carefully and not touching the copper conductive sections on the underside of the ribbon, reinsert ribbon cable into connector.  Be careful to center it and to fully insert it, moving it side to side double check to verify that it’s all the way in.

Now lock the ribbon down against the mating contacts using the locking wedge clip.  The wedge is exactly that, with the side that goes over the cable flat and the top angled side on top to seat the ribbon down against the contact points.

Once again align the holes/slots in the circuit board with the 4 screw holes in the base.  The display lens has probably fallen out back at instruction 2, so place it back over the display, oriented with the flat side against the back of the display panel.

Sometimes the red plastic lens at the top of the controller has not been glued in place, has fallen out, and must be manipulated back in its nest.

Replace the back cover, insuring that it snaps flush closed all around.  If it doesn’t your board isn’t positioned over the screw points or the display lens is not properly positioned. 

Secure the back cover with the 4 screws.  And you’re done.